Compiling the footage of Prosser Reservoir from the Alder Hill fire camera
Heads up Tails up Running to your scallywag
Night falls Morning calls Catch you With my death bag
Prosser Reservoir and its surrounds are beautiful, melancholic and haunting. Most people would not have heard of Prosser were it not for the death of Kiely (pronounced exactly like ‘Kylie’) Rodni, a girl who was a month away from her 17th birthday. From what we know about Kiely, she was happy, vibrant, and musically gifted. Truckee itself, though, is somewhat well known as being one of America’s most haunted towns.
Kiely and her car, a silver 2013 Honda CR-V, went missing after midnight on August 6th. Law enforcement, including local police, CHP and the FBI, supposedly scoured Prosser Reservoir, in the case that Kiely had driven her car into the water. After all, her phone last pinged right near the water. Surely, but sadly, this had to be a typical case of a driver who took a wrong turn and drove straight into the water.
They found nothing, although it came out later that the diving teams were instructed to go no further out than 25 feet. Nonetheless, her car was seen in the water by several people, including Stoney Stone, who used satellite sonar imagery. He found the car on August 7th, and reported that fact. Yet, nothing was done.
CORRECTION: I just discovered that Stoney Stone did not in fact located Kiely’s car. He interpreted an artefact on Google Maps as a sonar image of the car. But in fact this artefact is still there on Google Maps:
Further, this spot is not where Kiely’s car was found.
Nothing, that is, until the Internet called upon Adventures With Purpose (AWP) to investigate. Their claim to fame was locating cars in bodies of water, often related to missing persons cases. Their good work has helped many families find closure when they otherwise would have had none. However, AWP has never before involved themselves with open cases.
AWP was told that Prosser had already been searched, so they searched all the surrounding bodies of water where Kiely’s car might be found. They came up with nothing, and so they decided that they would search Prosser after all. It was their last shot.
They found her car on 21st August, around the middle of the day, 50 feet out from shore and 14 feet down. To give you an idea of how deep the water was, the 2013 CR-V is a little bit longer than 14 feet (slightly more than 4.5m). If you stood the car vertically on the bottom of the reservoir, at the spot where the car was found, the other end would stick up a few inches out of the water.
Not long after that, it was revealed that footage existed of the car going into the water. As it turns out, there are firewatch cameras all over California. The one that captured Kiely’s car going into Prosser is located on Alder Hill. It doesn’t always face Prosser, but thankfully it did on the night of August 5th and the morning of August 6th.
The footage is actually 0.5 fps – one frame taken every two seconds. The images from the firewatch cameras are archived and can be accessed publicly. That is where I got the frames from. You can download the frames yourself from here.
There are a few problems with the footage. One is that it’s a wide shot. Remember that these cameras are firewatch cameras, not surveillance cameras. They exist solely for the public to help in spotting fires before they grow too big. So it’s nobody’s fault that we can only see pinpoints of light at night.
Secondly, and infuriatingly, there is a red light near the site of the Alder Hill camera which turns on and off all night. And it spills into the camera, causing annoying flares. It doesn’t obscure what we need to see but it really is annoying.
Thirdly, the cameras often lose focus when it gets dark. This makes it slightly more difficult to see precisely where light sources are located. It also doesn’t help that the camera is not completely rock steady, and there is a slight about of ‘gate weave’ (even though digital cameras don’t have gate weave per se).
The footage may not seem to reveal much, except to confirm the exact time that Kiely’s car hit the water. However, a reasonable estimate of the speed of the car was calculated by several observers, and that speed was about 10mph. We don’t know if the airbag deployed, but based on the estimated speed, it’s not likely that the impact with the water was enough to trigger the airbag. And in that case, it’s not likely that the car’s Event Data Recorder was triggered (it only records 30 seconds worth of data around an event).
From page 21 of the Honda 2013 CR-V Online Reference Owner’s Manual
We can see a lot of other activity occurring before and after Kiely’s car was submerged. We can see what seems to be people – i.e. car headlights – meeting for non-trivial periods of time. Were they trying to figure out where Kiely was? Did they suspect that she drove her car into the water? If so, everyone knew she was dead not long after half past midnight.
And if people knew what happened to Kiely, nobody said anything to police or to the press. And the search parties, the Teen To Teen talks, all of it, was a smokescreen.
I don’t really want to go into the conspiracy of how Kiely’s friends and family failed her. This is just a place to share my time-lapse videos of the Alder Hill camera. However, make no mistake, even if Kiely simply drove her car into Prosser purely by accident, there is absolutely a conspiracy of silence and deception about it. That is the best case scenario. But I think it’s worse that that.
There are two time-lapses that I have prepared. The first is all the frames from 5th August 4pm to 6th August 6am. The second is all frames from 4th August 3:15pm to 6th August 9am. In both cases, I have overlaid a daylight frame, where appropriate. I have also prepared a blink comparison video, which covers 3.5 minutes up until Kiely’s car’s headlights are no longer visible.
The shorter time-lapse:
The longer time-lapse:
The blink comparison:
I have made my observations, and I will let you make yours. Perhaps in the near future I will make a post about what I think are noteworthy moments.
A Jurassic Park inspired logo design for Del Boca Vista, the retirement village from Seinfeld
I created these recently and I finally got around to making them available for public distribution. Make your own posters and postcards, as large or as small as you like. The clip art I used is licensed for personal use, and obtained from clipart-library.com.
There are:
Three versions of the postcard, to be printed on A4 paper in pairs
Three versions of the poster
One 9:16 image for phone lock screens.
There is also a document that you can print on the back of the A5 postcards, which contains a place to write your message, a stamp box, and a place to write a recipient’s address.
There are three versions of the poster and postcard
The best way to print these at home is to use thick paper, like a 300gsm weight or greater, and print at the highest quality level. You will get great results with photo paper, too, but that’s not really necessary. If you try and use draft mode, you will notice some overhang from some of the clipart around the yellow ring. Keep in mind that if you’re printing on paper, the black ink might rub off on your hands.
A basic statistical overview of the likes and comments on Gabby’s 98 Instagram posts
Post 37. Hollywood, CA. 28 October, 2019.
Some time ago I had the idea to plot the number of likes and comments on all of Gabby’s Instagram posts. I noticed early on that her most recent post, dated August 26, 2021, had way more likes than the next most liked post, the one just before it. And the number of likes went down dramatically after that. I thought, this could be interesting.
But, I put that idea aside indefinitely. That is, until I watched this video on True Crime Rocket Science, a video channel owned and hosted by photojournalist Nick van der Leek:
“Statistics shouldn’t be applied as Gospel, but merely the logical jumping-off point.”
He discussed the use of statistics to help guide us – and law enforcement – to the most likely possibilities in any given scenario. Of course one can always appeal to Occam’s Razor, but that on its own isn’t very specific. In the case of Kiely Rodni, one statistic that should have been used, but was ignored by many, was that most of the time, a missing person is found near the location of their phone’s last ping to a nearby mobile network tower.
And so, energised by Nick’s discussion of statistics, I decided to go to Gabby’s Instagram account and start counting likes and comments. This kind of information is by no means meaningful to the investigation of her murder. Far from it. But I think it does have some utility in showing the ways that people interact with social media platforms, especially when their intentions towards a stranger are beneficent and well meant.
It’s also worth noting how few posts Gabby made on that platform. One would assume she would produce more than a mere 98 posts. Of course, YouTube is the more relevant platform for Gabby’s project, but at the same time, posting on Instagram is not especially time consuming. You would think she would have put up much more than she did – assuming that Brian didn’t delete any.
If you plot these data points on a graph, you get what a statistician would call a ‘long tail’ – large initial values, followed by rapidly decreasing values thereafter. In the case of Gabby’s posts, the long tail pattern exists, more or less, with the data points in chronological order. That is, from her most recent post to her very first post.
Likes, with anomalies notedComments, with anomalies noted
Of course, there are anomalies, for various reasons. Some of her posts happen to be significant for one reason or another. And by significant, I mean emotionally meaningful. For instance, a photo of Gabby looking her best, or posing in front of an angel wing mural, or with her boyfriend’s hand around her throat as they kiss.
These anomalies are highlighted with an image from that post. There are proper statistical methods to determine anomalies from the trend, although I just judged them visually.
Instagram posts can be shared via URLs outside the platform, and via stories within the platform. They can’t be shared in the timeline, as would be possible with other platforms like Twitter or GETTR. So the fact that certain posts got more likes than you would expect, given their place on the graph, is a reflection of individual interest more than it is of what is popularly shared. Those versed in psychology can better explain this kind of thing, where people independently come to similar conclusions about the same data.
Worth noting is that iOS lets you easily scroll to the top of a document or timeline, simply by tapping the very top edge of the screen. That’s the equivalent of the Home key on most keyboards, which, to the best of my knowledge, debuted on IBM keyboards in 1986. But in iOS, you can’t scroll to the bottom in such a way. Perhaps this, along with the chronological order that social media tends to use, explains why few people bothered to scroll all the way down to Gabby’s first post. The long tail shape of the graph is thus easily explained.
However, it’s interesting to note that only Gabby’s most recent post got a number of likes in the mid six figure range. Her penultimate post got in the high five figures – one sixth as many likes. That’s a significant difference. Maybe most people felt that the best tribute to her was to simply leave one like on her final post.
For what it’s worth:
Her least liked post was post 23, with 3397 likes and no comments.
Data was acquired on 29 August, 2022. Likes and comments were taken from hovering the mouse over the images on Gabby’s Instagram account while I wasn’t logged in. This was done on a desktop browser. But, Instagram does not allow users to view photos past a certain point without logging in. So, from post 59 and down, I had to use the Instagram Likes Calculator on phlanx.com. That site seems to accurately convey the data, as far as I can tell.
If you want to download PDF versions of these graphs, you can get them here:
I love a great idea. When I saw the promotional video for The Chenoo, it got my strict attention. I’ve seen quite a few promo videos for ComicsGate projects. The funniest was the one for Cash Grab, made by Scotty Richard. But the one for The Chenoo had depth and instantly created a great atmosphere, even if I thought the chosen music felt overdone. This book surely has promise, I thought.
The promotional video for ‘The Chenoo’
I received the book not that long ago – the middle of January 2021. I had no problem waiting, as that is the nature of crowdfunding. The benefit of backing a comic book project is that you know that some time in the near to mid term future, the book is going to arrive. You will get emails which keep you up to date about the state of the book, which does take away little of the surprise. But, it’s still rewarding when the finally receive the book in the mail.
Graham Nolan packed the book very well. Really, if there is any further protection that he could have given the book it would have been redundant. My copy arrived in mint condition. It came in a Gemini mailer, which a lot of ComicsGate publishers prefer. Inside, the book was further protected in a plastic sleeve with a piece of white cardboard behind the book.
Included in the package is one trading card, a rather odd bookmark, a sticker, and a letter from the author thanking the backers. The trading card is great, and is printed very nicely, but it should have been a bit thicker. The piece of backing card could have been printed with Chenoo themed art, or something similar.
Graham Nolan always remembers that it is the customers who make his work possible
You really could spend hours and hours fantasising about what extras could have been included with any given book. Foil stickers, keyrings, a full set of cards, what have you. We can hope that with each new book that the author releases, we will get more extras, and that they will be more sophisticated.
The book itself is the most nicely printed comic book I have yet seen. Not that I have handled very many comic books, much less premium ones. But without anything to compare, I am impressed. This is in stark contrast to the disappointing design of That Umbrella Guy’s first book, The Case of the Littlest Umbrella (which I reviewed last year).
This book is perfect bound, which means that it has a spine. I don’t have any issue with this, but the book isn’t thick or long enough to warrant perfect binding, and I would have preferred it to be stapled like a traditional comic book. The cover is a lovely satin finish, with the title being printed with a special glossy plastic. The pages are also of high quality stock.
One of the problems of perfect bound books is that you can’t always lay them completely flat. In any case it presented no challenges to handling. One aspect I find odd is that Nolan’s signature appears twice on the cover – once as part of the print file, the other done by hand. There is no need to have a signature on a cover more than once. If a CG artist is also the author, and they are signing the cover by hand, there’s no need to include their signature in the print file.
I had high expectations for this story, and I wish that I could say that they were met. The promo video was so well done that I got a feeling of being immersed in a rich environment with varied characters and lots of background.
But the story did not do justice to the idea. Nolan obviously could not spend 20 pages establishing a prologue. He set himself a limit of so many pages, which is logical, as he wanted to get the book out in a timely manner and with a reasonable cost.
But that is the problem here. The book isn’t ambitious enough. There is no room to develop a build-up, rich character history, or anything like that. Perhaps my expectations are much too high, but I stand by those expectations. I do not see the comic book as a trivial story telling medium.
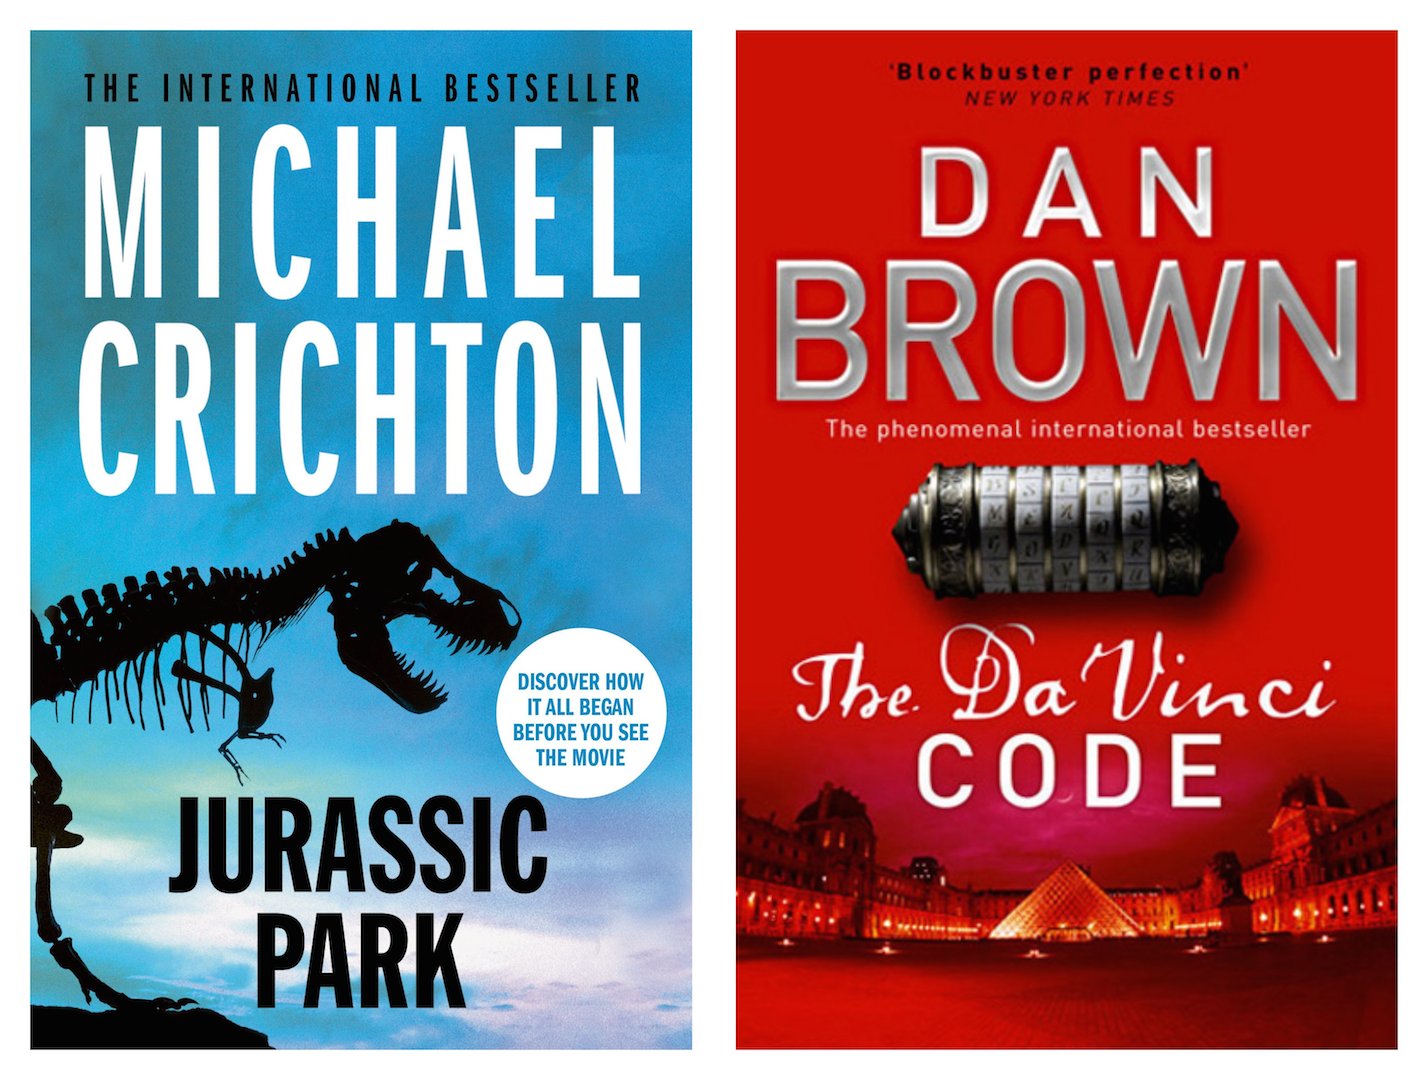
I have read two of Alan Moore’s graphic novels, the most important being From Hell. I’ve also read pretty much all of Michael Crichton’s novels, and all those of Dan Brown (though his recent one, Origin, was a dud). Recently I’ve been reading more novels of the ‘outback noir’ genre.
I’m used to grade A storytelling, and I am beginning to question whether comic books of such short lengths can offer anything challenging or satisfying. The Cyberfrog saga is spread over four books, which is probably going to be a total of something like 200 pages or more.
The Chenoo contains 57 pages of story plus a few pages of art, and a list of names of every person who backed the campaign. Nolan is a professional who is considerate to his audience, and who knows how to present a finished product.
57 pages sounds like a lot, but it is paltry, even when compared to a short story or a one-act play. That’s mainly because comic books do not have a large number of words on the typical page. Short stories are a very different animal to comic books. The comic book is primarily visual and is itself a product. The short story does nor require a specific medium to exist. You could print it in your office, copy it out by hand, read it aloud, put it up online, broadcast it, publish it in a magazine, whatever. Comic books exist in a particular format, and must be physical (digital comic books are not popular).
What a good short story has is depth, immersion and hopefully engaging characters. Truman Capote was very good at this. Usually, an adapted screenplay is based on a novel. But the movie Blow-Up was loosely based on a short story by Julio Cortazar – you can find it online as a PDF, and I recommend it highly.
Nolan has fewer than 60 pages to work with, and that doesn’t leave much room for character development. The characters are fine as they are, but we don’t know much about them. And if we don’t know much about them, we can’t empathise with them as much as we could.
In Psycho, Alfred Hitchcock spent almost 20 minutes establishing the background and motivations of Marion Crane. That’s a large part of the script, and it’s longer than it takes to read The Chenoo. You see the problem here.
Alfred Hitchcock gave the audience plenty of time to know Marion Crane’s character in ‘Psycho’
You can of course achieve a lot in a short time or space. I refer you to the short story Blow-Up which I mentioned above. But there is usually no substitute for the time necessary to establish characters. If you’ve seen the film, 30 Days of Night, you’ll remember that it took some time to establish some kind of background before getting into the meat of the story.
In the pilot episode of Twin Peaks, we get a terrifically written and performed introduction to FBI Special Agent Dale Cooper. In contrast, we don’t know very much about Laura Palmer until later episodes. But she is enigmatic in any case.
One more example of how to establish character: Rear Window, another masterwork by Hitchcock. Note here also that Hitchcock does not rush into the story – he lets things settle and evolve first, and as a result, the audience is immersed. Feature films don’t offer the same scope for character as novels do, but there is enough room to work with, especially for a top class writer.
Films like ‘Rear Window’ give the audience time to settle in before launching into the plot
In the beginning of The Chenoo, the two characters aren’t really that interesting and have nothing about them which could elicit curiosity. We just don’t know that much about them. One way that Nolan could make us empathise with the two men would be to make one of them homeless. Or an army veteran getting back on his feet after years of struggle. Or we could have seen the beginning or the end of a relationship between two disparate characters, such as a rich man and a poor man.
Overall though, the art and panel layout are top class. Nolan has drawn the entire book in grayscale, rendering only blood in colour. This device works well enough. It would ruin a book of photographs, but for a comic book it is certainly valid.
Panel layout is well disciplined. Where necessary, Nolan takes some creative liberties with the layout that work very well, given the context. Nolan also knows how and when to use full page panels. I’m not a fan of overlapping panels or odd panel shapes, but it’s a testament to Nolan’s skill that I really didn’t notice until after I had finished the book.
Lettering is supposedly by someone named Carlos Mangual. The lettering is very neat and legible, but all of it looks like it was typeset. This applies to the sound effects, too – it looks like they were taken from stock effects. I see no evidence of hand lettering in this book. There’s nothing wrong with using fonts in comic books, as this is exactly how every other form of text is published. But if you are using fonts or stock sound effects, then state as much.
Nolan used stock SFX, as well as a lettering font, both of which should have been done by hand
Speaking of SFX, I find that they are often overused. I recall seeing page of Jawbreakers: Lost Souls that had a sound effect that was not only redundant, but it weakened the effect that it was supposed to impart. I strongly believe that the sound has to come from the imagination, triggered by the art. Comic books are a visual medium, so the visuals should be allowed express themselves. In The Chenoo, there are many SFX that don’t need to be there, although for some reason this is only a problem in the later pages of the book.
There is one moment right near the end of the story, where one character utters a statement which is way too expository, and this takes you out of the story. But Nolan is in good company here. Interestingly enough, it is his namesake, director Christopher Nolan, who makes this boo-boo on several occasions in his otherwise terrific film, Dunkirk. Dialogue which is obvious in its exposition is clumsy and drawn attention to itself. Expository dialogue is useful and necessary, and is very important in theatre and cinema, but good writing hides it.
The basic ending of The Chenoo is, in principle, quite good. It’s solid compared to a decent Hollywood script. But there is no foreshadowing. Good storytelling usually features several mechanisms. Confict is one of them. Foreshadowing is another, as well as the anti-climax, the denouement, the red herring, etc.
The Chenoo seems to lack all of these elements, and comes across as very one-dimensional. Sure, there are moments where you might identify conflict here and there, but not in a meaningful way. You may think that there is a lot of conflict in this book – after all, we have a monster that is chasing down the main characters, right?
Think of Jaws. Where is the conflict in that film? Between the main characters and the shark? Between the characters? Both? What about other monster or horror movies? I’ll let you think about that one.
I do not consider myself a dramaturge, but if a story doesn’t grab me, I can usually figure out why. Not all good stories have obvious traits that you would expect. Breakfast at Tiffany’s – the story by Truman Capote – is extremely compelling and yet I cannot recall any obvious conflicts. The only conflict I recall is implicit: one day Holly Golightly was here, and then one day she wasn’t, and nobody knows if she will ever return. One of the keys to great drama is when characters face obstacles in getting what they want.
As far as conflict goes, a lot of David Lynch’s short films and TV commercials don’t have any obvious conflict either, although in many cases you cannot resist playing them again and again. Sometimes there’s a magic to a story that you can’t easily explain.
When you’ve read some of the world’s best novels and short stories; when you have seen some of the greatest movies; when you have read the greatest graphic novel ever written; when you’ve seen some of the most famous and celebrated stage plays, you have high expectations when it comes to storytelling. The Chenoo is a terrific idea. It could have been written with enough depth to create something that could have attracted a long term following.
Finally, there are two events in the story, occurring near the end, which are internally inconsistent. Needless to say I will not be specific. But they are so obvious that I am amazed that they are there. One of them might be excused because Nolan has only so much room to work with, but by this point I was just frustrated and disengaged completely.
Graham Nolan deserves high praise for his attention to detail as far as presentation goes. And he never forgets that it is the customers that justify his work. His book, as an object, is an example for other creators to emulate. He made sure to have it printed in North America, too. It’s a shame that some ComicsGate creators went for the cheap option of having their book printed in China. Nolan may not have written great fiction but he proves himself to have very high standards as a publisher.
So, do I regret backing this campaign? No, I absolutely do not regret it. The more comic books I read, the more I can figure out what they lack, and what they need to be truly engaging. I have a few ideas that I want to realise one day. One thing I need to do, as an aspiring author, is to get a feel for what’s being created, and how. In addition, ComicsGate people are just terrific. I am happy for Graham that his campaign has been a success, in the same way that I am happy for That Umbrella Guy that his two campaigns have been successes.
I hope that Nolan’s next book, Alien Alamo, is written with the care and attention that the best scripts are given, whether they be stage or screen. Because otherwise, his art and ideas and standards of production quality will all be for naught.
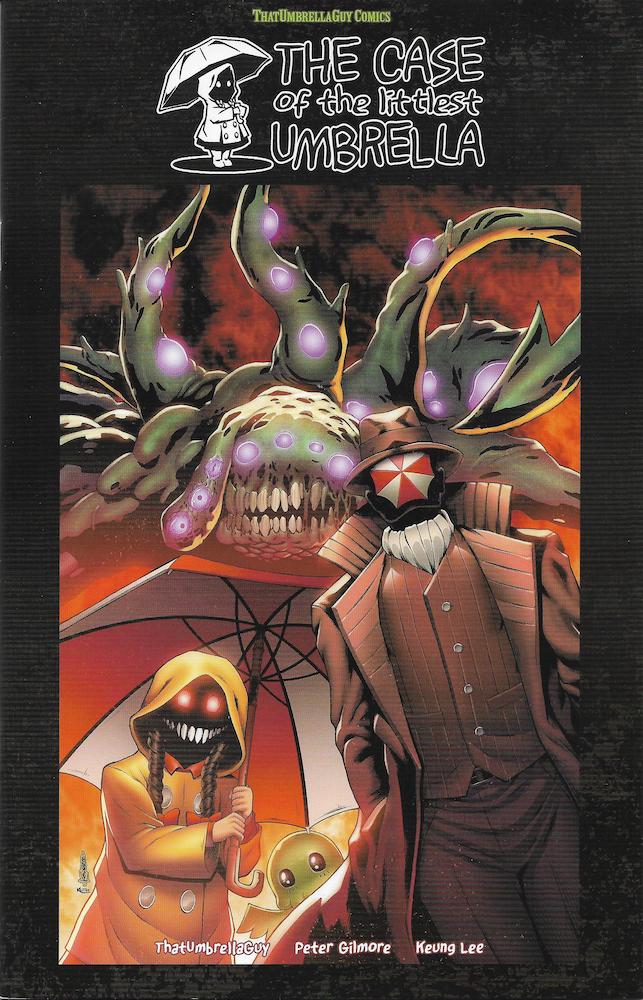
The Case of the Littlest Umbrella is the first book written by That Umbrella Guy, an independent creator who has never before published a comic book. TUG is a prominent member of ComicsGate, and has his own online presence, including a YouTube channel.
If you’re not familiar with ComicsGate, it is an idea that creators should have the freedom to pursue their own IP, that treats customers with respect, and that is free from politics or any other divisiveness. CG includes customers, fans, and creators alike.
The book was launched as a crowdfunding campaign in 2019. The initial funding period saw the book reach over $75,000, and it made a grand total of $109,580 before the campaign closed. Following this unexpected level of success, TUG wrote a second book, with the same protagonists, which is currently in production. So far it has taken $143,280 in revenue, a significant increase over the first one, and it is still In Demand.
The Case of the Littlest Umbrella is described as a family friendly horror story, an “all-ages Lovecraftian experience”. Perhaps this sounds contradictory, but in fact this specific genre is quite common. You may be familiar with Goosebumps books, or Scooby-Doo, or The Simpsons Halloween Special (there’s only one good one). In fact, you could argue that Halloween itself is family friendly horror – kids indulge in it far more than adults do.
Being a crowdfunded campaign, this book did take a while to deliver, but the ongoing global health crisis caused further delays. I suspect that TUG will move printing to North America for future books, for various reasons. That is actually the norm – most CG books are printed in the USA or Canada, to the best of my knowledge. There is no criticism here of the delivery schedule, but I should point out that crowdfunded books are published in a different way than mainstream books.
My first criticism is that the book doesn’t look like a real comic book should. Now, the paper stock and print quality are terrific. But the cover looks very much like a self-published book would look like, which is to say, a bit… cheap.
Yes, this is actually a self-published book, but that’s not the point. The point is to give the look and feel of a proper comic book (or graphic novel). This is easy to do. This does not require the use of flimsy cover stock or newsprint (not that those things are necessarily bad).
It does not even require the inclusion of charming advertisements, although it would be wonderful to see some creativity applied here, particularly for fictional brands and products. I’ve invented a few brands myself, purely for fun, due to my obsession with advertising. Once you flip through a collection of ads from the 1990s, your imagination will involuntarily deliver.
This is the book’s actual cover (the banding is due to my half-dead scanner):
And this is closer to what it should look like:
Notice: some kind of logo or hallmark should be in the top left corner. The title should be prominent, even though it risks obscuring the cover art (Jawbreakers: Lost Souls makes this mistake of undue reverential treatment of the cover art). Finally, the cover art should be a full page bleed, even if it’s a small graphic within large white space.
Once again, the paper stock is great and it feels good to hold and turn the pages. It’s arguably too good, depending on your tastes. However, the good news is that the book does stay open by itself. That includes both the first and last pages. This book is designed well as far as function is concerned, despite the lack of the aesthetics of a traditional comic book.
To my disappointment, the 44 page book contains three stories, not one. The main story is the interesting one, and it is 26 pages long. It is written by TUG and Keung Lee, and drawn by Keung Lee. The other two are more aimed at young children, and are written and drawn by Peter Gilmore.
The latter two, The Case of the Littlest Dino and Escape from Dino Island, are not really that interesting and could probably qualify as cereal box comics. Dino Island actually has a lot of promise, but it would need its own book of at least 44 pages to grow into. The art is superb, and the characters include TUG and his daughter, Little Umbrella Girl, both of which you will grow fond of, especially if you are familiar with TUG’s channel and personal life.
But these stories are unnecessary and together take up almost half the book. They force the main story to become diluted and therefore lacking in any depth. And that is the key as to why this book does not deliver what it ought to.
I’m not a horror fan, preferring spookiness and brooding to horror or gore. However, a good story is a good story, and the classical nature of this book’s inspiration, H. P. Lovecraft, promises much. I can appreciate films that have horror in them, such as Silence of the Lambs (terrifying), Twin Peaks (hypnotizing, brooding and creepy), The Exorcist (unsettling), and the series, Millennium (which dealt with evil more than it did with horror). In addition, I have read a few Stephen King novels such as It and The Shining. I’m a huge fan of Edgar Allan Poe’s work, which should be required reading for everyone.
Good storytelling has many facets, not all of which are required in any one story. Michael Crichton wasn’t always great with characters, but his stories were superbly told. Dan Brown is a terrible writer, but his best novels are so eye-opening that you never notice.
I wish I could say that I have read Lovecraft, but I have not. One podcast I listen to now and again, The Bible Geek, talks about Lovecraft a lot, and eventually created a podcast dedicated to that topic, The Lovecraft Geek. I have pretty much no exposure to anything Lovecraft, although now I’m tempted to give his work a look.
TCOTLU is set up quite well. I like the premise, the foundations, the characters. It appears to have elements of Millennium, or perhaps The X-Files, and goodness knows what else. TUG and his daughter, LUG, are the two protagonists. The supporting character, Bill, is also somewhat engaging – at least in principle, as we don’t see much of him.
The story begins with a short prologue: a writer in what seems to be a haunted hotel. Or is it all in his head? Starting off with a prologue is a very effective way to give a story depth. The best prologues are as disconnected from the body of the story as possible. The best example is The Exorcist. Do you remember the prologue? You probably don’t unless you’ve seen the film in the past few years. And if you don’t, you will be pleasantly surprised with what you see. That is excellence in storytelling.
However, the prologue here doesn’t have much impact. And that’s precisely because the main story in this book is only 26 pages long. We don’t really have any idea as to who the character is. We don’t know what he is writing, or why. On the surface, what is on those pages should be interesting. But it’s not. We don’t even know what might be on those pages, or why the author behaved the way he did before he left the hotel.
It’s the same for the opening scene of the main story. We should be interested in where TUG works, how he got there, what cases he is working on, and so on. And we are once again disappointed. The reason is quite obvious. It has nothing to do with the number of pages, but the lack of depth. Depth is created in several ways. The simplest way is to give characters and places dimension, and you can only do that with details. What is the name of the agency for which TUG works? Where is it and why does it exist? Where does TUG live? How did TUG get this job and what was he doing previously?
These questions don’t have to be completely answered, but they do need to be hinted. In the pilot episode of Millennium, we are given some glimpse into Frank Black’s background. Not a whole lot, but enough to establish something about him. The episode, like most serialized TV, is self-contained, but does lay down ominous hints at what the future will bring.
I have not forgotten that TCOTLU is supposed to be kid-friendly. The events that occur in Millennium are so disturbing that I would not expect to see them in TUG’s book. But what I do expect is just not there.
To give you an example of how time or space limits can produce incredibly engrossing and compelling stories, I point you to three films, all created by David Lynch. Premonitions Following an Evil Deed is but 63 seconds long. It was made as part of the 100th anniversary of the Lumiere Brothers’ first cinema camera, and is part of a collection, Lumiere and Company.
The next example is one of the shorter stories by Edgar Allan Poe, The Sphinx. I would be very surprised if you didn’t find this incredibly effective:
At the end of the day, we need to tell our own stories in our own style. Nobody appreciates copycats. But, we can certainly find inspiration and illumination from storytellers who came before us.
The second story, The Case of the Littlest Dino, at five pages long, is obviously intended for parents to read to their younger children. But it takes away valuable space from the main story.
The third story, Escape from Dino Island, at ten pages, is potentially interesting in its own right, but again, it takes away valuable pages that could have been used for the main story.
Dino Island throws us right into a situation where LUG is tied up by a supercriminal who owns a dinosaur infested island. But, there is no immersion. There is nothing here that stokes the imagination, either. It seems that Peter Gilmore has little of interest to add to the genre of dinosaur island sci-fi. But his art is superb here, and on the level of that of Keung Lee.
The world which TUG has created has promise, and the fundamentals are all there. The art, to say it again, is grade A. The characters are likeable, especially LUG, bless her little gumboots and pigtails. Yet the execution is lacking. The cover should have been more dynamic, the book was not printed in the USA or Canada, the story didn’t arouse my curiosity, the characters lacked depth, and I didn’t feel as immersed as I would be in a Poe story or a Crichton novel.
But I certainly don’t regret backing this campaign. When you back the campaigns of creators, particularly ComicsGate creators, you’re not merely interested in the books, you’re supporting people. I do not regret that I spent US$25 plus postage for this book. In fact, I backed the sequel, Another Case for the Littlest Umbrella. If you are CG, and you have the budget, go to the campaign page and give it a look.
Nimiq is a blockchain crypto asset built from the ground up to focus on Web browser operability, from holding the coins, all the way to actually mining them. Just as importantly, it’s also the most fun you’ll have in the crypto space right now.
Overview
Nimiq, exchange code NIM, properly launched in Q2 of 2018, when its mainnet went live. The mission of Nimiq is ease of adoption for the general public, and the method to execute that mission is the Web browser. While you can use other methods to hold and mine NIM, you can do everything right in the browser. And that means you can mine it on any device with a Web browser and an Internet connection.
Like a lot of people, I’ve spent and wasted a lot of time messing with mining hardware and software over the past two or three years. It’s as frustrating as it is rewarding. Sometimes, the instructions haven’t been updated, and so in those cases you find yourself having to figure it out on your own. But a lot of people, who otherwise want to get into crypto assets, find that sort of thing terribly off-putting.
Enter Nimiq, nine years after the launch of Bitcoin. NIM is very much a modern crypto coin – browser based, easy to use, and aimed towards the general public. There are important features that can’t be avoided, such as a set of 24 Recovery Words (which we’ll get to below), but you need that kind of thing to make any blockchain product truly useful.
The best way to create an account is to simply go to nimiq.com. If I have to write a tutorial for you to get started, then perhaps crypto isn’t for you. This is not a put-down. But if you can’t make use of NIM by yourself, at least for the basics, then the creators haven’t succeeded.
The home page actually shows you how to get started with an animation in the top right corner. You choose a randomly generated identicon, or Nimiqon, create a password, and proceed to the next steps.
At least one Nimiqon is required for each account, but you can create as many as you like, as they represent deposit addresses. It’s like having multiple accounts with the same bank.
The next thing you will be asked to do is to download a QR code card that looks something like this:
This is what you will use to login to your account, whether it’s your 27″ iMac or your cheap Android phone you got at Woolworths. This code is basically an encrypted version of your Recovery Words.
After you download your QR code, you will be asked to write down your 24 recovery words. They suggest that you don’t keep them anywhere online, and that you print them out and store them somewhere safe. These recovery words let you rebuild your account in case you lose your password or your login QR code.
Finally, you will be asked to verify that you followed the instructions. It might sound redundant, but unlike your Netflix account, your crypto wallets are so secure that you will never be able to call a help desk if you lose access. Even when you log out, it will ask you to type in a short phrase, and remind you to keep your login details safe. This is exactly how all of this works, because you are effectively your own bank.
Logging out of your account
At this point, you have access to your wallet, or, as Nimiq calls it, your safe. You will be given the chance to obtain one free NIM. It’s not worth much at the time of writing, but you should certainly take it.
The fun begins
Okay, so now you have an account, one deposit address, and one NIM, which is probably worth US$0.002 at the time of writing. Great! Hopefully you found the process somewhat enjoyable and comfortable so far. But wait – there’s more!
From now, there are two ways to obtain NIM. You can buy it from an exchange, if they sell it. Or, you can mine it.
If you aren’t familiar with mining, it’s the common term for proof-of-work (POW), which means that an active node on the network gets rewarded with coins while it’s running. POW is a kind of consensus method, which helps maintain integrity in the blockchain. So, Bitcoin miners get rewarded with Bitcoins, or BTC, and Nimiq miners get rewarded with Nimiq coins, or NIM.
Mining is where the real fun begins. Because Nimiq supports mining right in the browser. You don’t need any special software. You can mine on a cheap Android phone, or a fully featured Mac Pro (wheels included!). Or anything else: an iPad, an Android tablet, a cheap PC, a laptop, a Raspberry Pi, as long as the Web browser is relatively up to date.
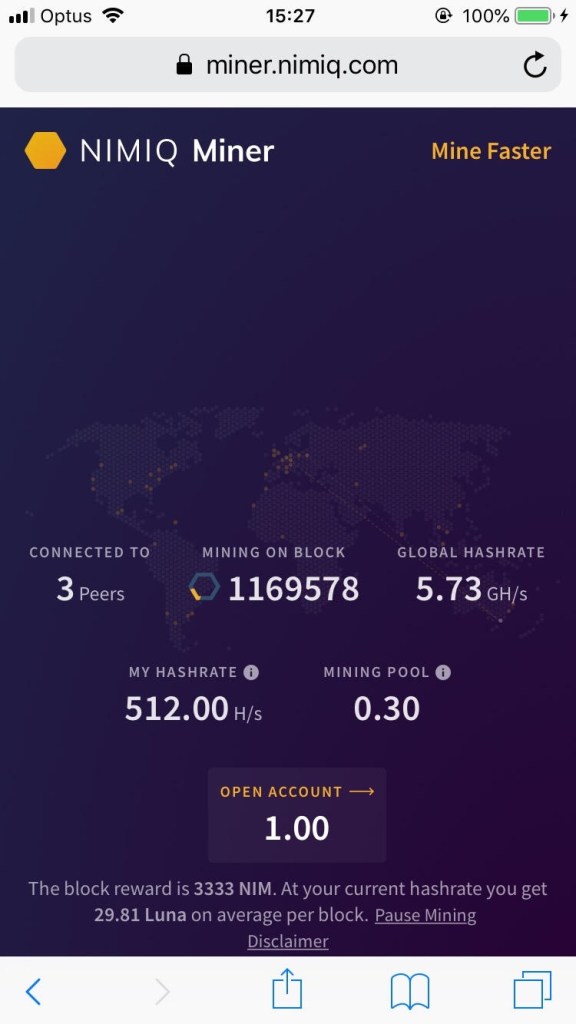
To start mining, log into your account. You will always require your QR code file and your password. Once you’re logged in, the easiest way to access the miner is to type miner.nimiq.com into the browser’s address bar. You will be asked which address you want to mine to. At this point we’ve only created one address, so use that by selecting its Nimiqon.
You’ll be taken to a world map, coloured in purple, with nodes marked in orange. You will be asked to join a mining pool. To do that, click on Mining Pool. For now, it doesn’t matter which pool you choose. Just pick one, then close the pop-up box. Eventually the miner will started connecting and validating. You know you’ve started mining when you see a hashrate displayed. A desktop browser will display something like this:
This is what you will see while mining NIM on a desktop computer
You might even be able to mine on either old or specialised Unix workstations, if you can install a modern Web browser on them. Of course this is starting to get a little deeper. But there are certainly those of you out there who are advanced hardware users who also want an easy and fun way to get into the crypto space. If you’re familiar with Sun, Silicon Graphics or IBM Power System computers, you’ll know what I’m referring to.
A Silicon Graphics Octane 2 from 2003; the original Octane was released in 1997
Two caveats, though. Firstly, mining with a Web browser isn’t as efficient as mining with a specialised application. You do have the option of downloading a dedicated mining application, but most people don’t have to worry about that.
Secondly, mining does use a lot of CPU cycles, which means: you will use more electricity; your battery in your mobile device will be hit harder; your device may overheat; other applications won’t run efficiently while you’re mining.
However, I have not noticed any real problems, apart from the lower performance of other applications. The phones that I have used so far have gotten warm, but nowhere near their safe limits. Just as an example, an iPhone 6S uses 1W while plugged in and fully charged. While mining, it uses 5W. That’s nothing compared to other appliances, but then again, you aren’t mining much either. You can pause and restart mining whenever you like while you’re logged in.
An iPhone 6S mining NIM
You can determine how much processing power that your device is going to use for mining. Select the option, My Hashrate:
You will see a slider at the bottom of the screen, which lets you choose how many threads you want dedicated to mining. You can choose from one or more:
The benefit of mining is that you don’t need to own any amount of a coin or token to obtain it. You just have to run your miner. This will cost you electricity, but it will also make it unnecessary for you to purchase the coins on an exchange. The only problem is that mining does not currently yield very large rewards. Having said that, some people run miners not so much for profit, but for either fun or for supporting the network.
A cheap Android phone mining NIM
Not only can you mine on your personal devices, you can mine on anything from a work computer to a demo unit at a retailer. You should only do this to benchmark these devices – mining without permission is in some places a sackable offence, and in some places it may even be illegal. However, retailers will let you play around with their demo units if you just want to collect benchmarking information.
If you’re benchmarking a computer, you’ll need to take a USB stick with you which contains your login QR code. What you need to do is to open the Web browser, log into your Nimiq account using your QR code image, then begin the mining process. Give it a couple of minutes at most and make a note of your hash rate.
But, what about iPhones and Android tablets? Most iOS devices don’t let you attach external storage, and that’s for maximising security. So your QR code image has to be downloaded to the device another way. What you can do is to store it on a service such as Postimage or Dropbox, and then write down a shortened URL. Here’s what that shortened URL might look like:
Load that image from the Web browser, save it to the device, then open the Web browser to log into your Nimiq account and start mining. Remember to delete the Login File from the device in all cases.
There are problems, though, with Android devices. Some cheap devices will occasionally interrupt the mining process with system alerts. Some will not allow you to disable sleep mode, which means you might have up to 30 minutes of mining before the system puts the device to sleep. Thankfully, iOS does allow you to disable the sleep mode on all devices.
Going forward
And now we come to the future of Nimiq. Right now, Nimiq has a POW consensus method, explained above. For Nimiq 2.0, we will likely see a change in the consensus method from POW to POS (proof-of-stake). This means two things: mining will be eliminated and replaced with staking; and in order to accumulate any useful amount of NIM, you will have to buy some up front.
The positive aspects of staking over mining are significant. Firstly, there is no need to worry about electricity consumption. While mining pools share workload, the work is all done by the members of that pool on their own devices. But staking pools are different: the client’s devices don’t need to be operating. All you need to do is place or reserve your coins in that staking pool.
Staking is actually very much like bank interest. The more coins you stake, and the longer you stake them, the more staking rewards you get. Most coins use the POS consensus method, or something similar. And most of them apply compound interest – in other words, your staking rewards are more coins. Some coins such as Vechain (VET) reward users with secondary tokens. VET requires no action on the part of the clients, but the payouts are not in VET, but in VeThor tokens.
Depending on whom you talk to, mining is more fun despite the requirement for powerful hardware for significant gains. But, as a blockchain matures, difficulty increases, and so miners have to keep upgrading their hardware. Staking is somewhat boring. But, instead of buying hardware, you just buy the coins and let compound interest go to work.
Some would say that staking encourages saving whereas mining encourages spending. That’s because staking is like compound interest and the more you save, the more you receive. But mining hardware depreciates, even if the coin grows in value, and so miners feel the need to sell some of their coins to offset the depreciation of their hardware.
Full disclosure: I do own a modest amount of NIM and I probably will slowly increase that over time. This is not financial advice, but I feel I should declare it.
Further reading
This is a solid overview of the Nimiq project by Coin Bureau:
It’s easier than you think to install a cryptocurrency miner on an Android phone – and you don’t even need to hack the system software
Note: the mining pool referred to below seems to be non-operational. Please use https://poolium.win/ instead. I will update the tutorial later.
If you have an Android phone or tablet that has passed its use-by date, or if you just want to set up a low energy miner, it’s relatively easy to do. The basic tutorial is found here, on the iMineBlocks channel:
(26:06)
There are two things to note with that tutorial. Firstly, it was specifically devoted to Fireworm, a fork of cpuminer. Fireworm is a Verium miner exclusively. The good thing about Verium is that it is a CPU coin, which means that GPUs will not give you any advantages over a CPU that uses the same Wattage. Secondly, the tutorial was based on Linux Deploy, which requires root privileges. That sort of stuff is unnecessarily complicated, and you will not always succeed, depending on what rooting method you use, and what device you are using.
This tutorial will eventually discuss how to set up an account with a mining pool. A mining pool is a collective of individual miners who share the burden of mining a given coin. Mining solo is possible but you will have more consistent rewards if you’re a member of a pool. But we want to get the miner successfully installed first.
This tutorial is based on the video above, and you will be installing Fireworm. But there will be one change: we are going to base our installation of Fireworm on UserLAnd, a Linux installation that does not require root privileges. Rooting an Android device is a pain, as you don’t know if the process is going to work or not. While Android is based on Linux, it is not Linux proper, and so you do need to install a distribution of Linux to use Linux applications.
Firstly, let’s have a look at the commands as Lee, the channel owner, has written them:
Fairly simple. All you have to do, after you have installed your preferred version of Linux, is login to Linux and run the commands. But hold that thought just for now. The first thing you will need to do is install UserLAnd.
UserLAnd is fairly straightforward. You download it from the Play Store and run it. Then you select which distribution you want. You don’t ever have to think about root privileges. For this experiment I decided to buy a cheap, discounted phone with Android 7. The CPU is a quad core 1.1GHz Cortex-A53. Not exactly a powerhouse, but it will do. There are potential issues with these cheap phones that could cause frustrations – but hold that thought, too.
A cheap Alcatel phone. Because it’s not going to be used for anything other than mining, I kept the plastic film over the screen instead of buying a more durable screen protector.
A suggestion before you begin: create a Google account just for your mining devices. I have a Gmail address for everyday communication, but I created another one just for this and future miners. If that email address somehow gets compromised, I won’t care so much. Remember that if you use YouTube, Google Docs etc, your account includes those. So keep your mining and personal accounts separate.
After you download and run UserLAnd, your screen will look similar to this:
Select Debian and give the app the required permissions.
Create a username, and for the sake of convenience, use the same password for your username as for VNC. Usually you wouldn’t do this, as it’s a security hazard. But you are just running a crypto miner, so it doesn’t matter.
Once you tap on a text field, the keyboard will appear, just like normal. The icons to the right of the password fields let you see the text you are typing. It’s wise to make use of that feature, as you aren’t asked to confirm your passwords.
When you are done, tap the blue checkbox at bottom right. You will see the Continue button.
Tap on Continue, and select SSH.
Once you do that, you will be taken to the login screen. It’s pretty much like any other Linux login screen you’ve seen that doesn’t have a graphical interface. Don’t worry about the text above the login prompt. I have no idea what it means, either.
After you have successfully entered your password, you will be logged in.
Now all you have to do is type in, or paste, the commands that install Fireworm. The easy way to do this is to send the commands to your preferred Gmail account that you can access on the device, and then copy and paste them into UserLAnd. I’m going to show you what that should look like before explaining what you’ll be doing.
You’ve noticed that there are a few differences with the list of commands listed near the beginning of this document. I’ve changed two things. Firstly, I’ve added the double ampersand between each command. This allows you to string together multiple commands that can run one after the other.
If you want to run the commands one at a time, you copy one command, paste it into the Linux command line interface (CLI), press return, and wait for it to run. For example, you might type ‘apt-get update’ into the CLI, then press return, and let it go until it completes. Then you would type ‘apt-get upgrade’, wait for that to complete, and then go on to the next command.
But I’ve strung them together, so you would type ‘apt-get update && apt-get upgrade’ and they would run one after the other. But I’ve also added an extra command in front of those: ‘sudo’. Sudo, in common language, lets the commands after it run as if they were typed by the superuser. But the cool thing is that you aren’t actually the superuser – it’s like getting most of the power of the superuser with the protection of normal user status. That is a little bit too technical for most of us, but all you have to know is that sudo lets you run commands with maximal potency and minimal risk.
I didn’t need to use sudo for ‘cd veriumMiner’, as that simply changes the working directory to ~/veriumMiner.
However, just because you strung together a bunch of commands doesn’t mean that the commands behave differently. They behave exactly the same way as they would if you entered them one at a time. So if user input is needed, the system will wait until user input is given. Once you run the commands as written above, you will soon come across a prompt to type ‘y’ or ‘n’. This should happen twice:
Because we included the command ‘cd veriumMiner’, we are in the sub-directory, ~/veriumMiner.
Remember that we started in our home directory:
The tilde is a shortcut for your home directory. In this example, I chose the username of miner, so if I typed the command ‘pwd’ (‘print working directory’), the returned value would be ‘/home/miner/veriumMiner’.
So, back to the main exercise. We are now in the ~/veriumMiner directory:
If you typed the command ‘ls’, you should see a list of all the items in ~/veriumMiner:
At this point, the miner has been downloaded, including all the dependent software packages, and compiled. It’s ready to go. However, we do need to get to the business of setting up an account with a mining pool. Thankfully this is very easy. Because I use a pool called Beertendr, that’s the example I’ll be using here.
Because this sort of thing is not complicated, we will go through the process quickly. Firstly, click on ‘Sign Up’ at the top right of the screen.
Next, enter your details. For now, you do not need a coin address.
Then you set up your workers. In general, one device or computer uses one worker. In my case I have had up to three separate devices mining on Beertendr. Because of that, I have set up three workers. One for a PC, one for an old Samsung tablet, and one for the cheap Android phone. Your workers are visible by going to My Account -> My Workers.
You’ll notice that none of them are active at this point. Worker passwords aren’t crucial to account security as far as I know. In fact, many pools either don’t require them or don’t use them. I recommend using them anyway, if you have the option.
So now you have an account with a mining pool, and you have at least one worker. There are three variables derived from that: your mining pool username, a worker name and a password for that worker. The miner does not ever ask for your account password, as that is completely unnecessary. It should be obvious, but you do not need to be logged into your pool for your pool account to be active.
So, now we have two things: a mining pool account and an installed mining app. Let’s go back to the shell prompt and type in the command and variables that will get the miner working. It will look something like this:
If you’re not used to seeing that kind of input, have a look at it more closely:
‘cpuminer’ is the command. The ‘./’ that precedes it tells Linux to run the following command (an executable file, or process, or application, or program) in the current working directory. Because cpuminer is not a part of the shell, you can’t just type it without the preceding dot-slash. The ‘-o’ specifies that the following variable will be the URL of the mining server. The ‘-O’ specifies that the following variables will be the username, workername and workername password, all in one statement.
Here is what I would type in to run cpuminer with my Beertendr account. My username is Panatomic, the workername is phone, and the workername has a password which is typed in after the colon. I have redacted the password:
There are some problems which you may encounter, depending on the phone you’re using. Sometimes when you copy and paste from an Android app into the Linux shell, the command may be 100% correct, but Linux returns an error. That’s because the system clipboard pastes extra characters into the shell that you may not notice. In this example, the clipboard pasted ‘\302\240’ (I blanked out the password) :
This was no doubt due to the fact that I typed the command into the notepad app and copied it from there. All you have to do is backspace part of the way, and then manually type the command to get it to work.
Assuming that everything was done correctly, once you tap enter, the miner should start. Mining crypto is full of frustrations, so be prepared to fail when you’re starting out. In fact, prepare to fail at all times. The rewards are not always going to seem worth it. But if you want to support the network, and earn some coins on the side, it is quite satisfying.
This is the sort of output you should see after you tap enter:
If you want to stop the miner, tap CTRL and then tap the c key. If the keyboard is hidden, just tap on the screen and it will appear. Linux will return ‘SIGINT received’ and you will be taken to the prompt.
You can run the miner in the background, or when the screen is locked. Most higher end phones should allow this by default. But on this phone that you see here, it’s not the case. It’s not a very high performance device, so by default, the miner will quit when you lock the screen or go to the home screen. However, there is a way around that. In settings, select Duraspeed, if it is available:
You will be given a number of options. The first thing to do is to deselect as many apps as you can. This will free up more resources for the miner. Or, at least, that’s what appears to be the case. Then, turn on Duraspeed:
Right, so because you turned on Duraspeed, the miner will continue to work when you are looking at other apps, or when the screen is locked. You may still get issues, however. In this case, Android is alerting me to the fact that the Maps app isn’t responding:
This is annoying, but it doesn’t necessarily have to mean that there is a problem with the miner. Just watch the screen, and if the miner appears to be working, you don’t have to do anything. Of course you probably should just tap on ‘Close app’ anyway. This may happen a lot, and you might get several alerts, stacked on top of each other. On certain occasions, the miner process will be killed, and you have to restart it. That’s actually easy to do, as you tap the up arrow key until the ./cpuminer… command comes up again, and then you just tap return.
And, perhaps every now and then, the process will be killed for no reason. But, maybe it’s just with cheap phones. I have a Samsung tablet from 2010 that has never shut down by itself. But its performance is so anemic that it’s almost not worth it except to test the concept. Thankfully it cost me very little money – a good example of taking an informed risk in op-shops.
Power consumption for most phones is very low, even though mining performance isn’t great either. But, higher end phones will offer much more performance and use either the same amount of electricity or only slightly more.
As an experiment, while the miner was running, I let the battery drain to 80%, then plugged in the phone’s charger to the mains. My domestic energy consumption meter returned a maximum of 3.8W. Then I turned off the screen and nothing changed. When the battery reached 100% charge, the energy meter returned the same value while the screen was on. Turning off the screen returned a maximum value of about 2.8W.
I hope to eventually write a similar tutorial for mining Monero with the new algorithm, Random X. For intermediate and expert users, that should be easy to do, based on the information I’ve outlined here. For those who aren’t so comfortable with this sort of thing, check back every couple of weeks, or just subscribe to the blog.
4/3 sensors are a quarter of the size of 36x24mm sensors, but what about the cameras and lenses? And is it better to use a large sensor with a slower lens?
When digital photography entered the mainstream, the big question was whether or not it was good enough to replace film. The answer was obviously no, but that didn’t stop the huge surge in digital camera sales, and the rapid change that occurred in the industry.
Gilbert Rossi took this shot of Ivan Lendl with Fuji Pro 400 pushed three stops to ISO 3200. Lighting was less than ideal. Lens was a Nikkor 200/2, wide-open, on an F3. The event was the Custom Credit Australian Indoor Championships, held in October of 1984.
For years, digital sensors had no quality advantages over film, save for convenience and speed (the turnaround time, not the cameras). Colour negative film had been pushed to ISO 3200 for many years before even the first mainstream digital camera went on the market. The results were grainy but entirely usable, with good colour and contrast. As for frame rate, the Canon F-1 High Speed (1984) could shoot at 14fps, while the Nikon F3H (1998) could shoot at 13fps. Neither of those cameras were matched by a digital SLR until the Nikon D4 was released in 2012.
A well exposed frame of 8-perf 35mm was not as clean as a typical digital sensor, but it resolved more detail. And, of course, film had almost twice the dynamic range as the earliest sensors. These days, some emulsions still have more DR than almost any digital camera, but the lead is not what it used to be.
One of the few milestone cameras that started to really challenge the quality dominance of film was the Nikon D3. The D3 featured a 36mm sensor that had 12Mpx and offered a usable 3200 ISO, and which was not to shabby at 6400 either. Finally, there was a handheld camera that was fast in more ways than one, and had image quality that could actually challenge film.
It was still a big camera, but the D700, which followed not to long after, mostly solved that problem. The D700 was not as compact as the Olympus OM-4 or the Leica M6, especially with lenses. But many photographers decided that the compromise was worth it at the time.
A year before the D3, Leica released the M8, a rangefinder camera that had an APS-H sized sensor (1.3x crop factor compared to the traditional Leica format) that gave very good results. The Kodak sensor was a 10Mpx CCD and its files at base ISO could be printed to very large sizes. This was the first ‘mirrorless’ camera that offered a sensor that challenged film in terms of quality. It wasn’t fast in any way, but it was quite compact, even compared to the smallest DSLRs. Two out of three ain’t bad, though.
The Leica M8 was released in 2006. It is still in use today, and many photographers shoot it for the quality of its b&w files. Photo: Stephan Roletto, https://flic.kr/p/7iowra
And a year after the D3, Panasonic released the G1, which evolved into a hybrid stills & video camera that made possible a great many low budget movies. The G1 had no video, but it did have features which we still think of as modern: an impressive EVF, face detection, a multitude of scene modes, three aspect ratios, a flippy screen (that vloggers can’t always get on the latest cameras) and an unlimited JPEG buffer with a good SD card. In 2010 Panasonic released the G2 which included 720p video at up to 60fps.
The Panasonic G1 could not out-perform 35mm or digital SLRs, but its successors can and do. Photo: Brett Jordan, https://flic.kr/p/6rLdZS
So after all this, we have a landscape where two things happened:
Digital cameras surpassed film in most areas; and
Mirrorless (or DSLM) cameras made DSLRs completely redundant, the final nail being driven by Sony’s A9, released in 2017.
It was a long ride. In geological time this 20 year period is a mere blink of an eye. In Internet time, it’s an entire eon. But some things don’t change. An ounce is still an ounce, and an inch is still an inch. Optics is optics, and quantum efficiency is not negotiable. We know that most Micro 4/3 kits are smaller than any given DSLR kit, but here’s the trick: are they smaller than other mirrorless systems? And if so, is Micro 4/3 a logical trade-off?
Before we continue, keep in mind that we’re mainly looking at zoom lenses here. Most people find that zoom lenses are a good compromise between image quality and versatility. However, I’ll include a couple of prime lens comparisons at the end. I’m also focusing on Olympus vs Sony, as I know more about those brands than, for example, Panasonic or Fujifilm.
Handing and ergonomics are mostly subjective areas. But size and weight are things we can make judgements on in short order. But before we get serious, let’s have a look at something:
E-M5II vs A6400, both with kit lenses. These are the smallest standard zooms you can get with these cameras. However, the Olympus zoom does telescope, as does the Sony. Both lenses are mediocre but good enough for some applications. Note that the Sony here has optical stabilization, but the Olympus does not.
However, Olympus and Panasonic have the best sensor stabilization in the business, which should give the Olympus the advantage as far as hand-held long exposures are concerned. Except that in this case, the Olympus lens is probably too ambitious as far as size goes, and its image quality is not quite as good as the larger 14-42/3.5-5.6 II R. The latter tests better than the other two according to DxO. Here’s what the bigger Olympus zoom looks like:
But now the size advantage isn’t as great. You could mount the Panasonic PZ 14-42/3.5-5.6, which is as small as the Olympus 14-42 EZ. It does have OIS but to the best of my knowledge, Olympus bodies don’t apply lens corrections in JPEGs. Mounting it on a Pansonic body yields different results, depending on the model. Here are the GX85 (with IBIS) and the GH4 (no IBIS) :
But now it’s time to get serious. We’re using the Olympus E-M5 II vs the Sony A6400 as our standard bodies, as they retail for roughly the same amount. Let’s start with just the bodies.
The Sony is pretty much the same size and weight as the Olympus. There are differences but I think that they are not worth worrying about. The problem for Olympus is that the Sony body is about the same size, despite the fact that it has a sensor twice as large.
It depends on how you want to cut the cake. In some scenarios, the Sony will give you better images, due to its higher DR, which is about two stops. On the other hand, the Olympus has IBIS, which gives between three and five stops of stabilization. At worst, the E-M5 II has a one-stop advantage over the A6400 if you subtract DR (at base ISO) from the IBIS rating. But that’s only applicable if the subject is not moving.
Now let’s try this same comparison with lenses. Let’s start with the standard zoom. Preferably, the standard zoom – and the moderate tele zoom – should have a constant aperture. The lenses we’re looking at are the Olympus 12-40/2.8 and the Sony Zeiss 16-70/4 E.
What’s surprising here is that the Sony kit actually weighs less (878g vs 711g). At worst, you’d expect them to weigh the same. The 4/3 sensor is half the size of the APS-C sensor. Any lens that’s an f/2.8 lens on the 4/3 sensor can be expanded to cover the APS-C sensor at the loss of one stop. So, given that, it is surprising that the Olympus weighs more. The Olympus is weather sealed, while the Sony has OSS and is not usually revered for its optical qualities.
Going further, that same f/2.8 lens becomes an f/5.6 lens if you expand its image circle to cover a 36mm sensor, such as that in the Sony A7. But… hold that thought.
And while you’re holding that thought, let’s have a look at something else. Sony recently launched the 16-55/2.8 E, which is the first f/2.8 standard zoom made by them for the E mount system. You might think that it’s going to be somewhat larger than the Zeiss 16-70. You’d be right:
Compared to the Zeiss, the size difference is significant, as is the weight difference: 308g vs 494g. But considering that it’s an f/2.8 lens, it really isn’t that much bigger than the Olympus. Prima facie, that’s a pretty hard hit for Olympus to take, given the differences in sensor sizes. It’s worth pointing out that the 12-40 is over 100g lighter, although you wouldn’t think it. Now you know why a lot of people consider that the sweet spot is with APS-C sensor mirrorless cameras.
We’re now going to look at ultra-wide zooms. Let’s put the 7-14/2.8 Pro on the E-M5 and let’s put the 10-18/4 OSS on the A6400.
Not only is the size difference insignificant, but the weight advantage is with the Sony. However, it’s not that simple! While both have optical stabilization, only the Olympus is weather sealed. And it is an 8x zoom whereas the Sony is a 6x. You could conclude that for the same size, Micro 4/3 gives you more. Now, you could swap the 18-105 for the 18-135/3.5-5.6, and the Sony now is not just lighter but smaller:
However, you’re getting a sliding aperture, one stop less at the long end, and a slightly narrower AOV at the wide end. Like the 18-105, the 18-135 has OSS but it is not weather sealed. Both lenses telescope, but the Olympus telescopes more than the Sony.
Now we’ll compare the Olympus 40-150/2.8 Pro with three Sony lenses, two E and one FE. The Sony lenses are, from left to right, the 70-300/4.5-5.6 G OSS FE, the 70-350/4.5-6.3 G OSS E, and the 55-210/4.5-5.6 E:
Keep in mind that the 70-300mm isn’t exactly equivalent to the 40-150mm. But it does cover the A7’s sensor, and provides a narrower AOV on the A6400. Out of the three, the 70-350 makes the least sense, as it’s not much smaller than the 70-300. All lenses except the 55-210 are weather sealed. And the 55-210’s performance is hardly stellar. All Sony lenses telescope, but the Olympus does not, due to its internal zooming. The Olympus does not have optical stabilization.
Now, let’s try and find an equivalent standard zoom for the Sony A7, the smallest camera with a 36×24 sensor. If you applied a 2x teleconverter to the 12-40/2.8, you’d get a 24-80/5.6. There’s no such lens for the Sony, but the smallest equivalent is the 28-70/3.5-5.6 OSS. It turns out that the Olympus has the advantage:
They look very similar in size, but keep in mind a few things. The Sony has a sliding aperture, and it’s two stops slower at 70mm than the Olympus is at 40mm. The Olympus has a slightly wider AOV at the wide end, and a slightly narrower AOV at the long end. I’d say it’s a victory for Micro 4/3 here. Now, let’s put the Zeiss 24-70/4 on the A7:
The Olympus is clearly more compact, but not by as much as against, say, an APS-C DSLR. A comparison between either camera and a Nikon D500 would be mildly shocking, even if you put the relatively small 18-70/3.5-4.5 G IF ED on the D500. Try a comparison with the 17-55/2.8 G IF ED and it gets ridiculous. The DSLR is a metaphorical dinosaur in more ways than one.
This comparison is going to make you think a little bit. The Leica M9, with three lenses, vs the E-M5II with the 12-40/2.8:
In the case of either the 24/3.5 or the 50/2, the M9 combination weighs slightly less. in the case of the 90/2.5, the M9 combination weighs slightly more. But overall, any one M body and any two M lenses weigh more than the Olympus. Keep in mind that each of the M 240 and the M10 weigh more than the M9.
Finally, two comparisons with prime lenses. The first compares the Olympus 25/1.8 and the Sony 35/1.8 OSS. Neither is weather sealed. The Olympus combo is smaller but heavier:
Finally, a comparison of two lenses with almost the same focal length. Olympus 45/1.8 vs Sony 50/1.8 OSS. Again, neither is weather sealed. The combinations weigh the same but the Olympus is noticeably smaller:
In general, you would be right to expect that the Micro 4/3 lenses would be smaller than they are. However, I suspect that all Micro 4/3 lenses, especially the high end ones, are designed to cover a slightly larger sensor, as seen in the GH5s. Also, keep in mind that I have not shown all possible comparisons – such as the E-M1 with a 300mm prime vs the A9 with a 600mm prime. Not that I have to, because the differences are obviously immense.
Lens scores aren’t the full story, in the same way that sensor scores are not the whole story. It’s also worth pointing out that lens scores depend on the sensor. For example, the Olympus 12-40/2.8 has a DxO score of 20 on the E-M1, but a score of 25 on the E-M1 II (that’s due to the Bayer sensor which reduces resolving power).
Some things to remember. IBIS is not a substitute for a higher shutter speed. You can take surprisingly long exposures with IBIS+OIS, but the subject is still going to move how it likes. Larger sensors are always going to be superior for single shot exposures, even though the pixel shift mode of the smaller sensor will show more detail. In fact, Panasonic’s own S1 and S1R cameras not only have larger sensors, but they also have pixel shift mode. Same for the Sony A7rIII and IV.
A final point about IBIS. Not all Micro 4/3 lenses have OIS, but IBIS is so good that you don’t really need it. When you put the two together, however, you can get very long exposures indeed. With IBIS alone, Peter Forsgard managed this exposure of 2.5 seconds:
Then there is this shot which was the result of a 10 second exposure with the E-M1 II. Yes, 10 seconds. Mind you the lens used was an ultra-wide, but still, that’s quite impressive. Robin Wong managed five seconds, as he explains in his review of the E-M1 II:
I also must be honest that, if I were standing freely, without any support, bracing myself against anything, I can only shoot at about 1 to 2 seconds shutter speed. Anything longer than 2 seconds, my legs started to wobble! Hence for the 5 seconds shots shown in this blog, I was either sitting down on the pavement (twin towers) or braced/leaned myself on a wall or something.
Robin Wong
In conclusion, Micro 4/3 isn’t always going to give you the smallest combination of body and lens. Both Olympus and Sony systems – just two out of several – are quite different and offer disparate advantages. Sony offers superior low light performance and dynamic range. Olympus allows very long handheld exposures and other features such as focus stacking. It isn’t just about size and weight.
It’s safe to say that Micro 4/3 is the system for the majority of photographers – you won’t get outright image quality but you will get a system that does almost everything, from macro to landscapes to night-time cityscapes to sport to video, liberated from gimbals and dollies. At the end of the day, Micro 4/3 is extremely flexible. And because the system is so flexible, you could excuse it for not always being the smallest.
Bottle caps have been used for promotions, giveaways, crafts and charity drives for decades. Why not use them to give away crypto coins?
Not that long ago, I was speaking with my manager about the future of cryptocurrencies. I had a miniature epiphany, which to be quite honest was probably years after other people had the same thought: we’re going to see crypto coins created by mass market producers and given away in bottle caps, chocolate bar wrappers, cereal boxes, and even supermarket receipts.
But let’s step back a little bit, and let me indulge in a childhood memory. When I was between, say, 6 and 9, the kids in my neighbourhood – read ‘kids’ as ‘boys’ – would make their own bows and arrows out of branches found on the ground and in the woods nearby. The thicker, longer branches that could bend were used as bows, and the shorter, straight branches were used as arrows. Most of the kids used thick string for the bow, but my mum occasionally would crochet one for me. The tips of the arrows were bottle caps that we found on the street.
We would bend the bottle caps around the tip of the arrow with our teeth. We were careful but only boys would be stupid enough to do something like that. Boys and girls are, indeed, very different. Having said that, I knew a girl about 15 years ago who chipped a tooth while opening a beer bottle. But, that’s a whole other subject.
So apart from art projects and collectables, bottle caps had another use, if only fleeting and superficial. But while bottle caps were made from steel, cans were made from aluminium, and aluminium was worth money. I recall machines in supermarkets where you placed a can inside a slot, and it crushed it before paying you a small coin in return.
In certain parts of the world, you see people, usually kids, collecting aluminium cans for various reasons. Some do it just for the pocket money. Some do it for environmental reasons just as much as financial ones. And some people just like the exercise.
‘The Bottle Deposit’, a double episode from season 7 of ‘Seinfeld’.
There are all kinds of container deposit schemes in effect all over the world. The recollection of aluminium is done not only for environmental reasons, but also for economical ones: it’s cheaper to recycle the metal than to produce it. But CDS’s also cover glass and steel containers, and the main reason in those cases is to reduce litter.
In 2001, Paul’s, a dairy products manufacturer, began its Collect-a-Cap scheme. For every marked bottle cap returned, Paul’s gave 10c to a charity of the donor’s choice.
So why not take this further? There’s no reason that a packaged food manufacturer can’t create its own currency, then give it away with its products. The very first thing I thought of was ‘Pepsicoin’. No, this does not exist, but why not? It has a certain ring to it – much more so than Cokecoin, or Schweppescoin. If PepsiCo were to create Pepsicoin, I have little doubt that it would catch on, not just with its competitors, but with companies who make all sorts of packaged food. Breakfast cereal (government name: confectionery), chocolate bars, lollies, caramels, biscuits, etc.
All childhood memories involve toys found in Cracker Jack boxes. Perhaps they should give away crypto coins instead.
The primary function of the coin would be to redeem it for more product. But if the coin is able to be mined or staked, or even traded on exchanges, its use would extend outside the ability to simply buy more product. And, as a side-effect, the coin would be a stablecoin. If, for example, PepsiCo determined that the value of one coin was US$0.02, then there would be little incentive for the market to disagree. The market would treat it as a stablecoin with a face value of $0.02.
The other factors which will determine the success of something like Pepsicoin are its maximum supply, and whether it is inflationary or (passively) deflationary. Too few coins would discourage consumers from collecting large amounts, while too many coins might conceivably reduce PepsiCo’s net earnings. Perhaps a slight reduction in net earnings might be a good trade-off, but that is a decision that the manufacturer has to consider.
All of this could apply to retailers or service providers, particularly supermarkets, many of which offer rewards points. Instead of rewards points, why not just offer crypto coins? Rewards points can only be used within the issuer’s ecosystem. But a crypto coin, no matter what its worth, has universal application. Same goes for Frequent Flyer programs and so on. Either way, ditch the points, bring on the crypto.
Woolworths, like many supermarket chains, offers a rewards program. It would be a better idea for Woolworths to issue its own cryptocurrency and to give some away with each receipt.
In finance, cryptocurrency is where the fun is. And it could be that way indefinitely. There isn’t an IT department that wouldn’t like to set up a cryptocurrency for its organization. Consumer-level crypto may not be limited to packaged foods or retailers. It could extend to education and even to governments themselves. Time will tell, as always.
Just for fun, I purchased the pepsicoin.co domain name. I might use it to encourage companies to get going with their crypto projects. I don’t expect PepsiCo to buy it from me, but I do expect them to pay attention.
A collection of the lessons learned by ComicsGate creators while funding their books
In the beginning, you should have either:
A completed script; or
An outline from which a complete script can be written in a timely manner.
Don’t make promises you can’t keep. If you think you will only sell 500 books, then you can promise to sign every one. But what if you sell 1,000? 2,000? 5,000? You have just committed to signing all those books, and you cannot back out of that. If you aren’t sure, you can promise to sign only a fixed quantity to reward early backers.
Try and under-promise. Give a realistic time frame for how long the book will take to complete. It’s better to promise a time frame of 8 months and deliver in 6 than to promise 5 and also deliver in 6. You still delivered in 6 months in each case, but in the first case, you under-promised and over-delivered.
Understand the crowdfunding platform that you have chosen. If you are not sure which one to choose, Indiegogo is the default choice. Understand the fees, returns policy, and what kind of content is not allowable. Use clear language, especially for your logline. Make sure you can describe your story in one sentence if you need to.
The ‘gold rush’ mentality will make you miserable when you discover that you can’t just put up a campaign and expect the crowdfunding gold to just pour in. Doug TenNapel made over $750,000 for Earthworm Jim: Launch the Cow. Jon Malin made almost $175,000 for Graveyard Shift Vol. II. But these, and other creators like them, have established a reputation. Sometimes you can strike it lucky, just like winning big money in a lottery. But you should never count on that happening. Being creative is challenging, and creators should want to embrace that challenge, even knowing that they might fail from time to time. Clint Stoker, owner of the Sweetcast channel on YouTube, talks about this and related issues here:
(27:35)
In Hollywood, there is an open secret: producers are not only interested in the next big idea, they’re interested in the next big character. If your story doesn’t have a great character, perhaps try and find a way to make that character a little more interesting. However, not every character has to be Charles Foster Kane or Don Draper or Laura Palmer.
Itchy and Scratchy are good characters. Poochie is not.
If you are considering a sequel, have a good plot outline ready for that, too. Do this before you launch, even if you don’t know if your goal will be reached. It’s like homework: it’s better to finish it before the weekend. In Hollywood, the common wisdom is that you should have a second script ready if your first one is produced.
Good stories have several key elements, such as conflict, character arcs, protagonists, antagonists, foreshadowing and so on. You don’t need to be conscious of these elements if you are naturally good at telling stories. But if you find that your script doesn’t quite have what it should, maybe it’s missing a key element. Above all, your story must not be boring.
Create a legal entity like an LLC, even if you only want to create one work. If your budget allows, ask a lawyer specializing in IP and defamation to read your final product. If worst comes to worst, your LLC or S-Corp will protect you. In law, there is a lot of leniency when it comes to works of art, but you are not creating art works, you are creating a commercial product that happens to include art.
You will have legal obligations, from starting an LLC to declaring its income. Keep your receipts, and do everything via your LLC. Be organised.
If you are starting a publishing company as well as launching a book, make sure you have at least purchased a domain name and that you have set up social media accounts. You should also set up a Web presence if you plan on making a series of books under the same title.
Ask your accountant if they can also handle small business accounts. If not, find one that can. You, or your LLC, will have to pay taxes.
It’s not illegal to use brand names in stories, but it is advisable to not have those brands associated with negative connotations in your story. It’s a grey area, so try and use a fictional product where the connotations involving it might be negative. This is apparently more of a problem in cinema than in literature.
‘Mad Men’ often referred to real products such as Lucky Strike, Leica and Jaguar. It’s safer to use fictional ones if you can. (Note that all characters in this show are solid, and the writing and structure are excellent. ‘Mad Men’ is a masterclass in storytelling if you are creating serialised content. It is perfection.)
If you can, hire a pre-press professional. Your printer may very well be able to provide such as service. Either way, ask your printer what they need from you regarding pre-press.
Find an artist unless you want to draw your book yourself. When you do, you will have to commission them to do preliminary artwork for publicity and your crowdfunding campaign. If you are an artist who wants a writer, you will have to agree on an outline to work from if the campaign becomes fully funded. Commission a completed script before you launch your book if you and the writer can agree to terms.
Do not promise that your book will be a limited item. There can be limited variants or editions but the book itself should be able to be reprinted. You don’t have to allow the campaign to go into demand, but leave your options open.
Do not offer more than two tiers for the campaign. If you have to offer more than two, try and offer one less than you really want. Be clear as to how you label your tiers. ‘Book + Ashcan Prologue’ is preferable to ‘Double Deuce’. Just because Ferrari makes the grave error of offering 27 colour options for their cars doesn’t mean that you should follow their example.
Ferrari offers no less than 27 colour options. This is a bad idea. Nobody should be offered British Racing Green as an option for any Italian car. Do not offer more than two tiers in your crowdfunding campaign if you can help it.
Each campaign should feature only one book. Naturally, you can include supplements like posters and stickers. It’s great that you want to offer choice to your customers by offering them more than one book per campaign. But you have two problems: one, your campaign will have no focus; and two, you will have to multiply the number of tiers by the number of books, in addition to even more tiers which offer two or more books in the same package.
Mike Miller offered three books for this campaign, when it should have focused on one: ‘The Meg’. The number of tiers was no less than 25. This campaign earned half as much as ‘Lonestar: Heart of the Hero‘.
Do not lose one moment of sleep over the likely probability that people will release your book on the Internet. It is not your concern.
If the public takes a special liking to your characters, share fan art on social media if you see it. Only take legal action over serious copyright violations if any occur.
Cyberfrog fan art shared on social media by his creator, Ethan Van Sciver.
If you are criticised online, you are not required to explain yourself. And, if you have done nothing wrong, do not apologise, ever. You can have fun with antagonists, but be restrained and never be cruel. Even full-blown SJWs are children of God. If people have questions, answer them. You might already have a steady job, but a creative project is no less than a second full-time job, albeit a temporary one. Take it seriously, and be professional. Never be an antagonist.
If you don’t have a presence online, ask as many small channels as you can for interviews and air time. If they like your work, they would love to have you on their show. Bigger channels might like your work, too, but don’t expect them to promote your work just because you are ComicsGate. In Hollywood, relationships come before business. There’s a good reason for that. Give as much as you can, and you will receive later.
Let people know about your project before you launch your campaign. Don’t launch your campaign before you are able to promote it.
You can keep some things secret. But in general, share as much as you can. Don’t be precious.
Once you know the break-even point on your project (usually a book, but it could be something else like a video game or an animated cartoon), set your minimum goal to that break-even point. Some will disagree, but it’s better to not print the book than to print it at a loss to a small audience. Set your break-even point a little higher than you think it should be, to cover unexpected problems such as late cancellations.
Avoid using more than one crowdfunding platform. It might be tempting for you to put your project on Indiegogo as well as Kickstarter. But think very carefully about this. Let’s go back to your break-even point. If you set your break-even point correctly and you are on one platform, and if that point is met, then you can start producing the book. But if you want to put your book on two platforms, you have a choice: split your break-even point in two, or double it, by setting either of those goals on each platform. If you split your break-even point in half, and it succeeds on one platform but not the other, you are in trouble. If you double it, you might meet your goal on one platform, which is great, but you may not meet it on the other, which means you cannot claim those funds. There are other issues, covered in this video by Richard Meyer:
(23:14)
You have the right – even the duty – to make a profit. Crowdfunding does not entail a limit on your financial or creative reward. Crowdfunding is a tool to establish demand before you produce your book.
You are not being generous by undercharging for shipping. You are walking into a wasteland of regret. It is not for you to worry about saving your readers a few dollars. They can look after themselves. Your job is to make sure that your book either breaks even or turns a profit. Making a loss is not a hallmark of virtue. The reader who buys your book at a loss at $15 will still buy someone else’s book for $25 + shipping.
This is what Australia Post charges for postage from Australia to Great Britain for single parcels. Different services may offer cheaper rates for bulk orders. Do your homework!
If you feel that merchandise is appropriate for your book, your strategy will depend on what the item is. A t-shirt should never be bundled with the book. It will cost more to post, and it will also cause you trouble if you send the wrong size. You will have an insufficient amount of one size, and too much of another. Let a dedicated merchandiser handle your t-shirt orders on demand (basically, this is dropshipping). Make the t-shirt separate from the campaign.
An editor will see problems where you can’t. So hire one if it’s within your budget. You want to present your book as perfectly as you can. Otherwise, ask a few friends to give honest feedback. The point here is to seek an independent, detached opinion of your writing. The lettering will also have to be checked.
An editor can help you refine your writing. At the least, find a spelling Nazi to examine your letterer’s work.
You can hire a different artist to do the cover. This will add a touch of sophistication to the book. As a bonus, you have given work to one extra person. You can also offer a limited variant cover for early backers. Offer limited bonuses to reward early backers which will not be offered once your book goes into demand (i.e. when your campaign ends and becomes a store).
‘Downcast‘ by Clint Stoker. The campaign for this book offered two covers, one of them by the interior artist. The creator ran a very successful campaign despite having a small primary audience.
Make it a condition that no refunds will be issued once the campaign has concluded. This will prevent sabotage, whereby malignant actors support your book before asking for a refund, which puts you at risk of a financial loss. You may apply more lenient conditions once the book goes into demand.
Comic books are for everyone. If you wish to run a gentlemen’s or ladies’ club instead of a business, by all means do so, but make sure that the asking price matches the exclusivity.
The Cosmos Club in Washington DC.
Make use of your email list. The people who bought your book will not mind an occasional email after they have received their books. You should use your email list to announce new projects, if you decide to launch them. Engage your readers. Include polls or surveys in your emails if appropriate. If you can afford it, you can send promotional material to customers’ postal addresses on rare occasions. This can be a simple postcard. Physical mail gets the most attention, but it’s not cheap.
If you are suffering from hardship, do not use this as a selling point. You can bring it up later, once the book has been produced, and you can thank your customers for helping you overcome it.
Provide regular updates once your campaign’s goal has been reached. Even if you know you will deliver early, customers want to be assured that you are on the job. Post updates at least once a week.
Avoid turning your book project into a clown car. You need up to four people to create a comic book: author, artist, colorist and letterer. The cover art can be made by a different artist. The creator will take the profits, but they must pay everyone else first. You can have a co-creator on your project, but each creator will take an equal share of the profits. Too many creators dilutes the profits.
Do not offer ‘tip jar’ tiers. Your lowest tier should always include the book. If you want to create low-cost merchandise, do so separately from the campaign. For example, you can offer a poster along with the book, but if you also want to sell the poster separately, it should be sold via a dedicated merchandiser.
‘Dead Beats‘ is a 160pp graphic novel. The premise is a great idea – it’s a horror anthology, a refreshing break from the superhero genre. However, there were over 40 contributors! Each contributor will probably take home less than $500 or so. This project offered a total of 19 tiers, which nonetheless failed to break Mike Miller’s record-breaking 25. One tier was a tip jar. Some tiers included t-shirts. A big mistake.
You might find that you are more creative with a partner. You will have to split the profits, but you will be able to create more projects. Bouncing ideas off someone is a great catalyst for good writing.
Co-writers catalyse each other.
Make sure of your postage strategy early. Will you exclude certain countries? Will you charge different prices for different regions? Make enquiries with either your post office or a courier service, and know what to do when the time comes.
Separate the postage fee from the price of the book when it comes to estimating production costs. The cover price will cover production, and include a profit. The postage fee will cover postage. They are separate totals.
Insufficient postage fees should never be compensated from the cover price. Borrowing from Peter to pay Paul is not advisable. But if you made a significant profit from postage fees, you have charged too much. Thankfully, there is good data on what postage should cost.
Understand your packaging options. It doesn’t matter whether you wrap the book between two sheets of chipboard, or whether you put it directly into a strong, cardboard envelope. Be upfront as to how your book will be posted. Do make some effort to ensure that the book arrives in good condition. If you sell a large amount of books, consider using a fulfillment service.
An example of suitable packaging for books and posters. You don’t have to go all-out, but don’t skimp.
You are more likely creating a graphic novel (48pp+) than a comic book (32-36pp), due to the economies of scale. But what makes comic books great also makes graphic novels great. Hold a comic book. What makes it so attractive? It’s more than just the story or the character. What is it? Can you tap into that essence?
There is a wide variety of paper stocks and cover bindings. Figure out what you want early on. Your colorist will especially want to know what kind of paper you intend to print on. There is no rule that says that graphic novels have to be printed on high quality paper. Newsprint is a valid option, and there are several grades. Alterna Comics uses newsprint and readers are very happy with that choice.
Newsprint is a valid option for your paper stock. Many readers will prefer it. You might be surprised at how good it can look. This panel is taken from ‘Gen 13’, second series, #8, by Choi, Campbell & Garner.
Ashcans cost more per unit to produce than regular sized books do. Keep this in mind before you decide to include an ashcan in one of your campaign tiers. If the number of backers is not too large, you can produce your ashcans by yourself, either at home or at a self-service print shop. However, if you do that, these ashcans may not be seen as collectable, as they can be easily reproduced by anyone with a good photocopier. Also keep in mind that the more pages you have in a home-made booklet or ashcan, the more that they will protrude at the edge. A professional printing press is always preferable.
Avoid politics, and especially avoid lecturing your readers. If you know what you’re doing, or if there is a good reason, you can make a part of the story political. A conservative reader will not have an objection to reading a book which features Clement Attlee or Barack Obama. A liberal reader will not have an objection to reading a book featuring Nixon or Thatcher. Are those characters there to serve the story? If they are central characters, perhaps your audience will not be as broad.
Most comic books feature superheroes. But comic books, and particularly graphic novels, do not need to have anything to do with superheroes. Several ComicsGate books go in a different direction completely. Some of the best stories ever written feature normal people who face extraordinary, yet realistic, circumstances. If you have seen a film by Hitchcock, you have seen that kind of story.
‘Rear Window’ was made in 1954. It will be watched and talked about long after trendy superhero films are forgotten. You don’t need superheroes to tell good stories in a captivating way.
You do not need to have any knowledge of comic books or their history. You don’t need to have any experience in the industry. You don’t have to care about established characters, publishers or titles. You do have to deliver a good product, though. Hopefully, you will also have a deep appreciation of the comic book as a medium.
‘The Case of the Littlest Umbrella‘ is a Lovecraft-inspired horror story which is suitable for young readers. Like ‘Dead Beats’, it offers something other than a superhero story. A welcome development. The book was created by That Umbrella Guy, who had no experience in the comic book industry.
Michael Crichton has probably not read Thomas Hobbes. Dan Brown has probably not read John Buchan. You are not required to be a connoisseur in film, TV, comic books, art or literature. You don’t even need to be a good writer, although you should try to be. Dan Brown is not a good writer, but he is a terrific storyteller.
You cannot generate more excitement in society than these two novels did. Dan Brown in particular is not a good writer, but you never noticed. You might not create the next ‘Jurassic Park’, but you can learn from these two authors.
You don’t have to be a part of ComicsGate to be successful with a crowdfunded book. You don’t even have to like anyone in it. But you would be very wise to follow their advice. If you make your choices in spite of ComicsGate, you only punish yourself.
If your book is successful enough, you can consider foreign language versions. If your book is written in Portuguese, you might test interest among English readers. If your book is written in English, perhaps Japanese readers might like a Japanese translation. In general, don’t think about foreign language versions until after you have successfully delivered your book. Keep your campaign focused. In any case, a publisher may want to sell your book in foreign markets, and they will take care of translations.